질문)

HTML문서가 다국어로 되어 있을때에, 전송타입을 UTF-8로 설정하면 된다고 알고 있습니다. 그런데, 왜 HTML문서자체를 저장할때에 UTF-8로 저장야해야 하나요?

답변)

✅ 질문 요약

  • HTML 문서를 UTF-8로 전송할 때 Content-Type: text/html; charset=UTF-8로 설정하는 건 이해하셨습니다.
  • 그런데 왜 문서 자체를 저장할 때도 UTF-8로 저장해야 하는지 궁금하신 것이죠?

🔍 이유: "전송 인코딩"과 "파일 저장 인코딩"은 별개입니다

1. HTML은 텍스트 기반 문서입니다

HTML 안에 있는 모든 문자는 실제로 **바이트(byte)**로 저장되어야 합니다.
그런데 인코딩이 무엇이냐에 따라 같은 문자가 다른 바이트 시퀀스로 저장됩니다.

예를 들어:

  • "한"이라는 글자는 UTF-8에서는 ED 95 9C (3바이트)
  • EUC-KR에서는 C7 D1 (2바이트)

따라서 저장할 때 어떤 인코딩으로 저장했는지가 매우 중요합니다.


2. 브라우저는 인코딩 정보를 바탕으로 바이트를 문자로 해석

브라우저는 아래 순서로 문서의 인코딩을 추측하고 문자로 해석합니다:

  1. HTTP 헤더의 charset 값
  2. HTML <meta charset="...">
  3. 문서 자체의 바이트 패턴을 통한 추정

➡ 만약 UTF-8로 전송했는데 실제 파일은 EUC-KR로 저장되어 있으면?
브라우저는 잘못된 문자로 해석하고 **문자 깨짐(�, �)**이 발생합니다.


3. 예시로 살펴보기

파일을 EUC-KR로 저장하고 UTF-8로 전송한 경우:

html
복사편집
<meta charset="UTF-8"> <body>안녕하세요</body>
  • 실제 저장 인코딩: EUC-KR
  • 전송 인코딩: UTF-8 (헤더와 meta 모두)

✅ 브라우저는 UTF-8로 해석하려고 함
❌ 실제 내용은 EUC-KR → 잘못 해석됨 → 깨짐 발생


✅ 결론

HTML 문서를 저장할 때의 인코딩과, 전송하거나 브라우저에서 지정하는 인코딩은 반드시 일치해야 합니다.

  • meta charset="UTF-8"이라고 해 놓고
  • 파일을 EUC-KR로 저장하거나
  • 서버가 UTF-8로 전송하지 않으면

➡ 문자가 깨지거나, 오작동합니다.


💡 실무 팁

  1. HTML 파일은 항상 UTF-8 with BOM 없이 저장하는 것이 권장됩니다.
  2. IDE/에디터에서 저장 인코딩을 명시적으로 UTF-8로 설정하세요.
  3. 서버에서 Content-Type 헤더도 charset=UTF-8로 설정하세요.
  4. <meta charset="UTF-8">은 반드시 <head> 안에 아주 초기에 배치하세요.


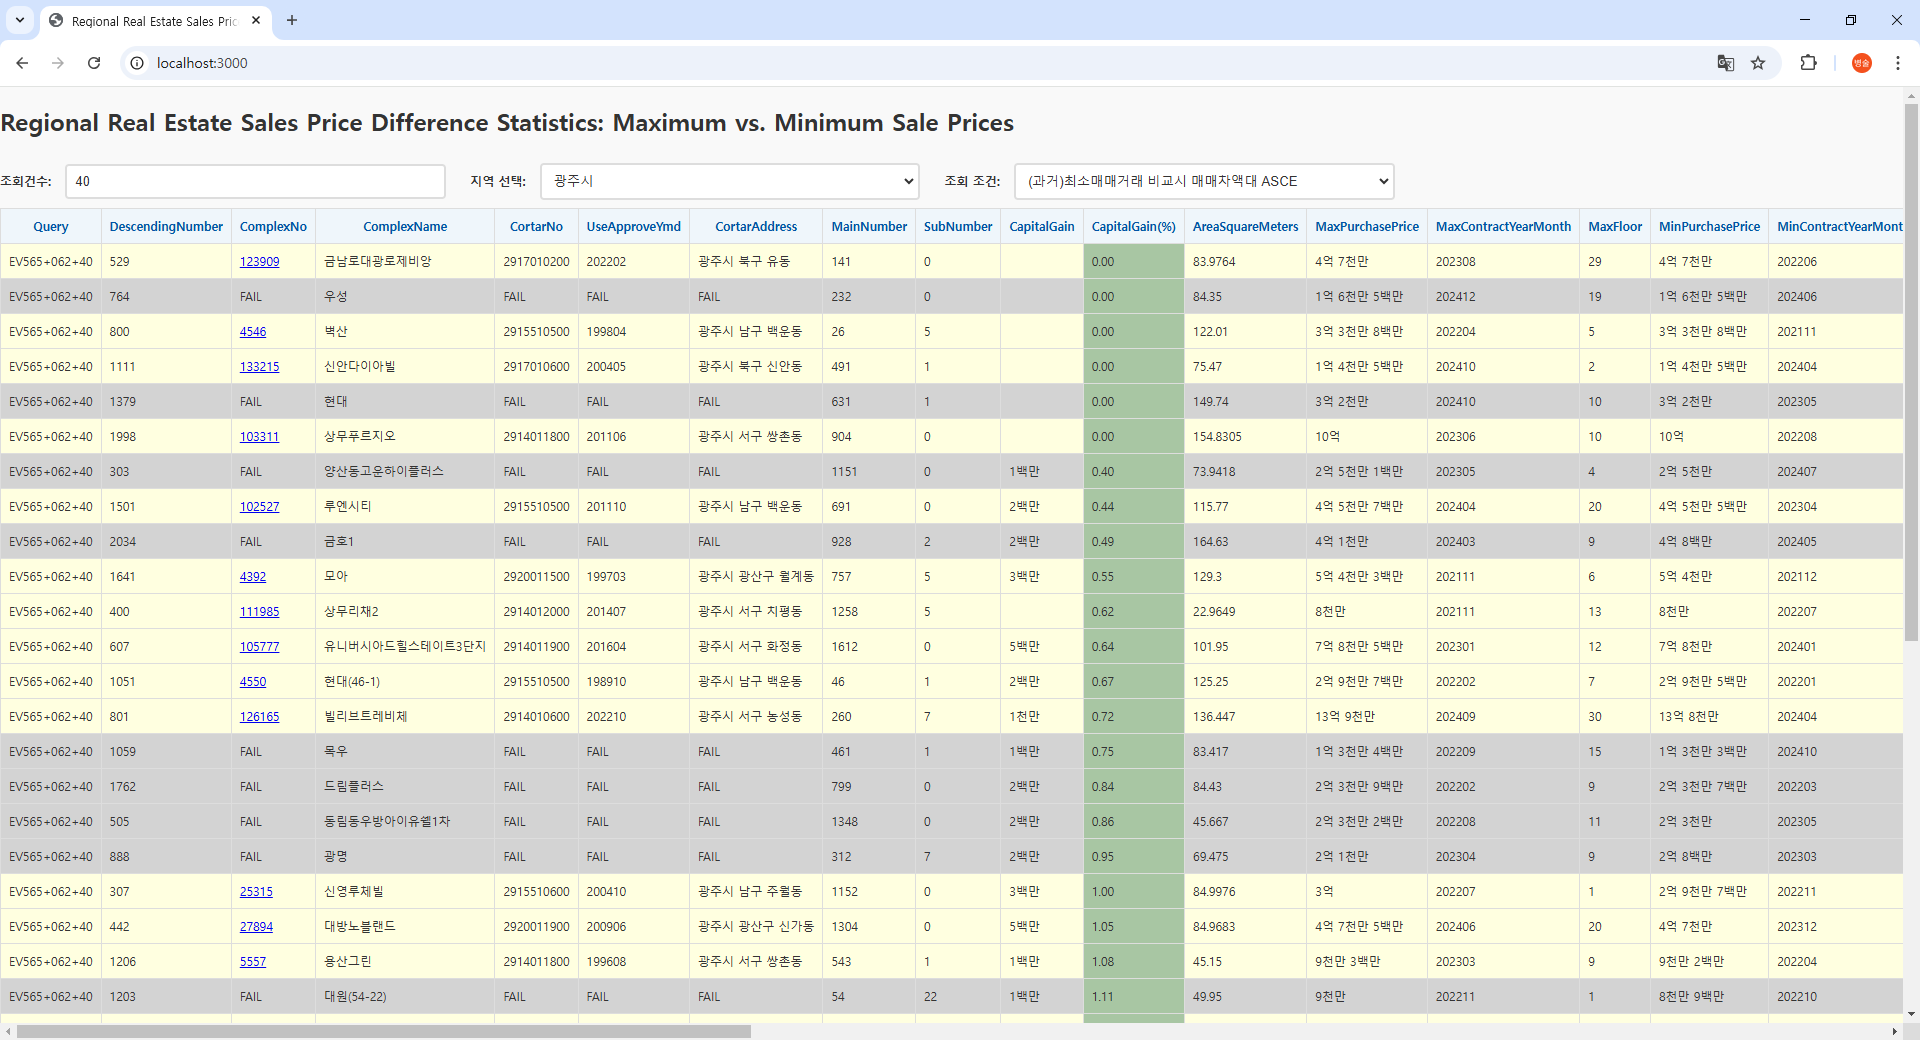
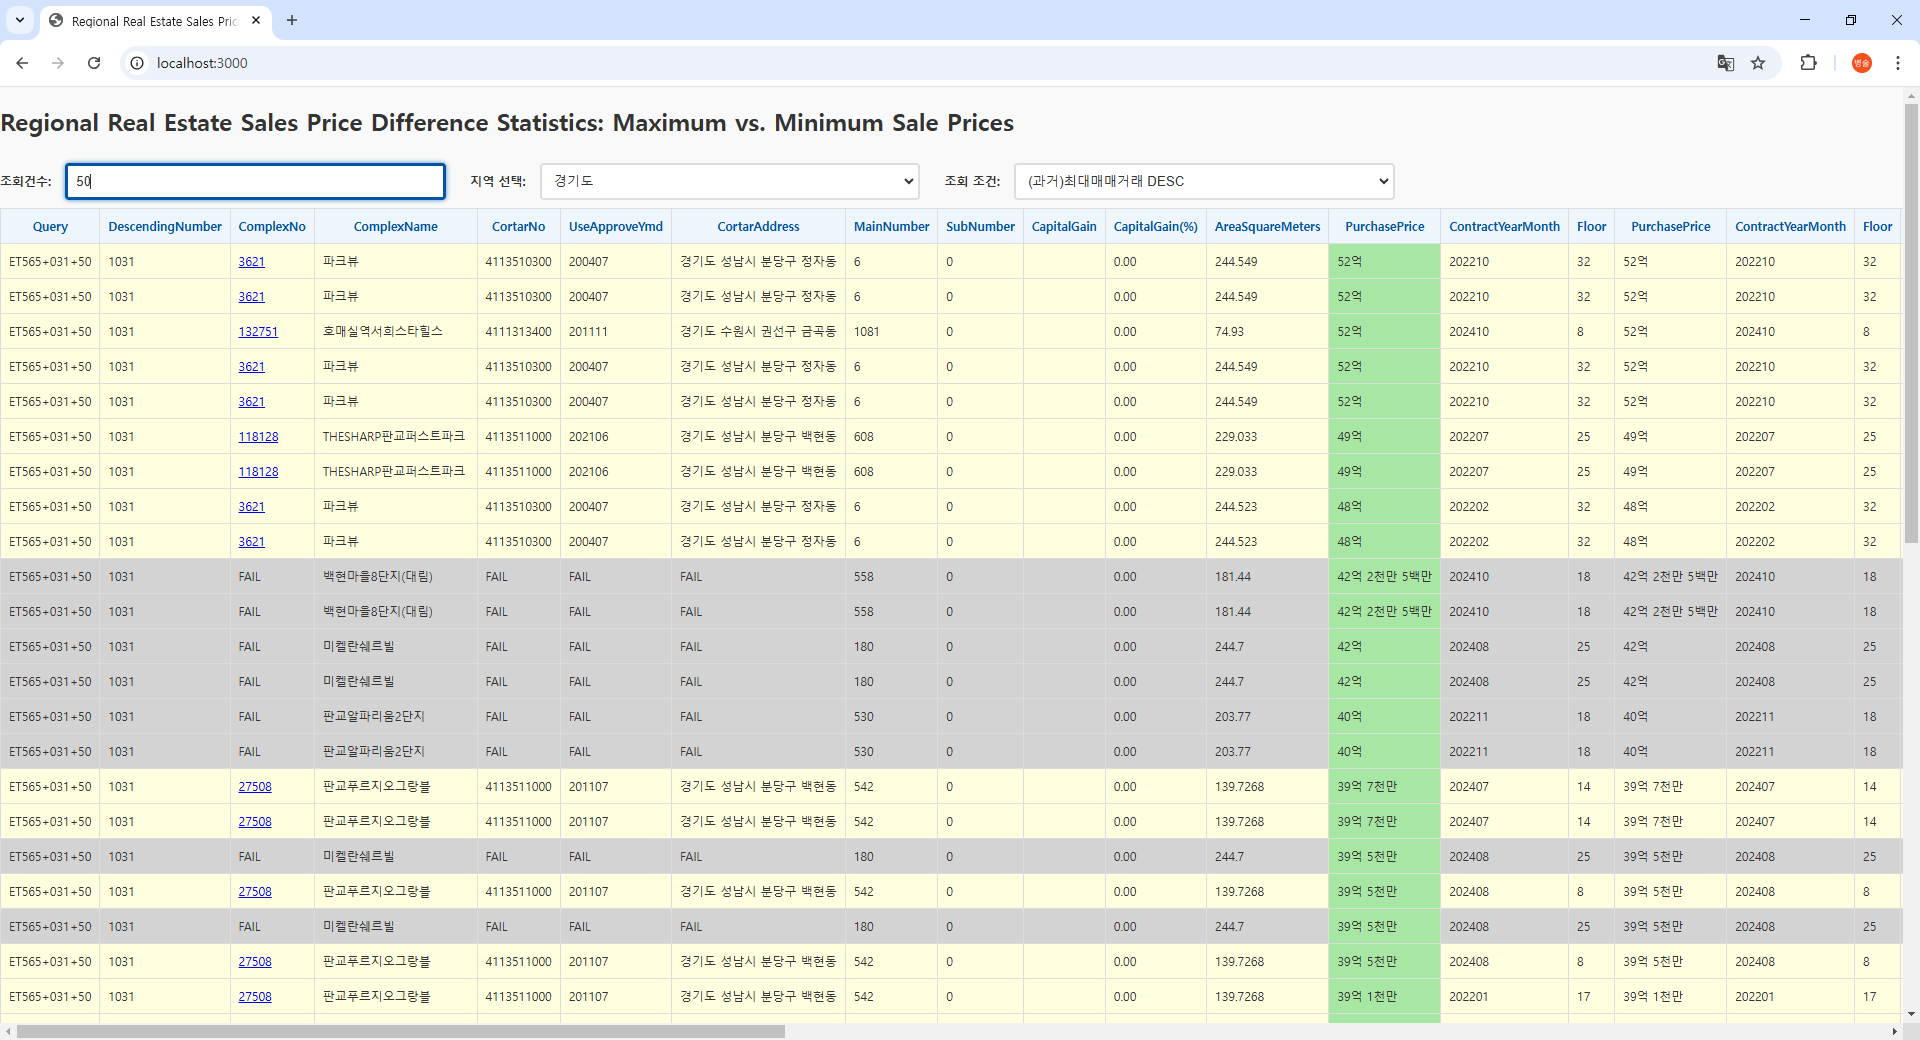
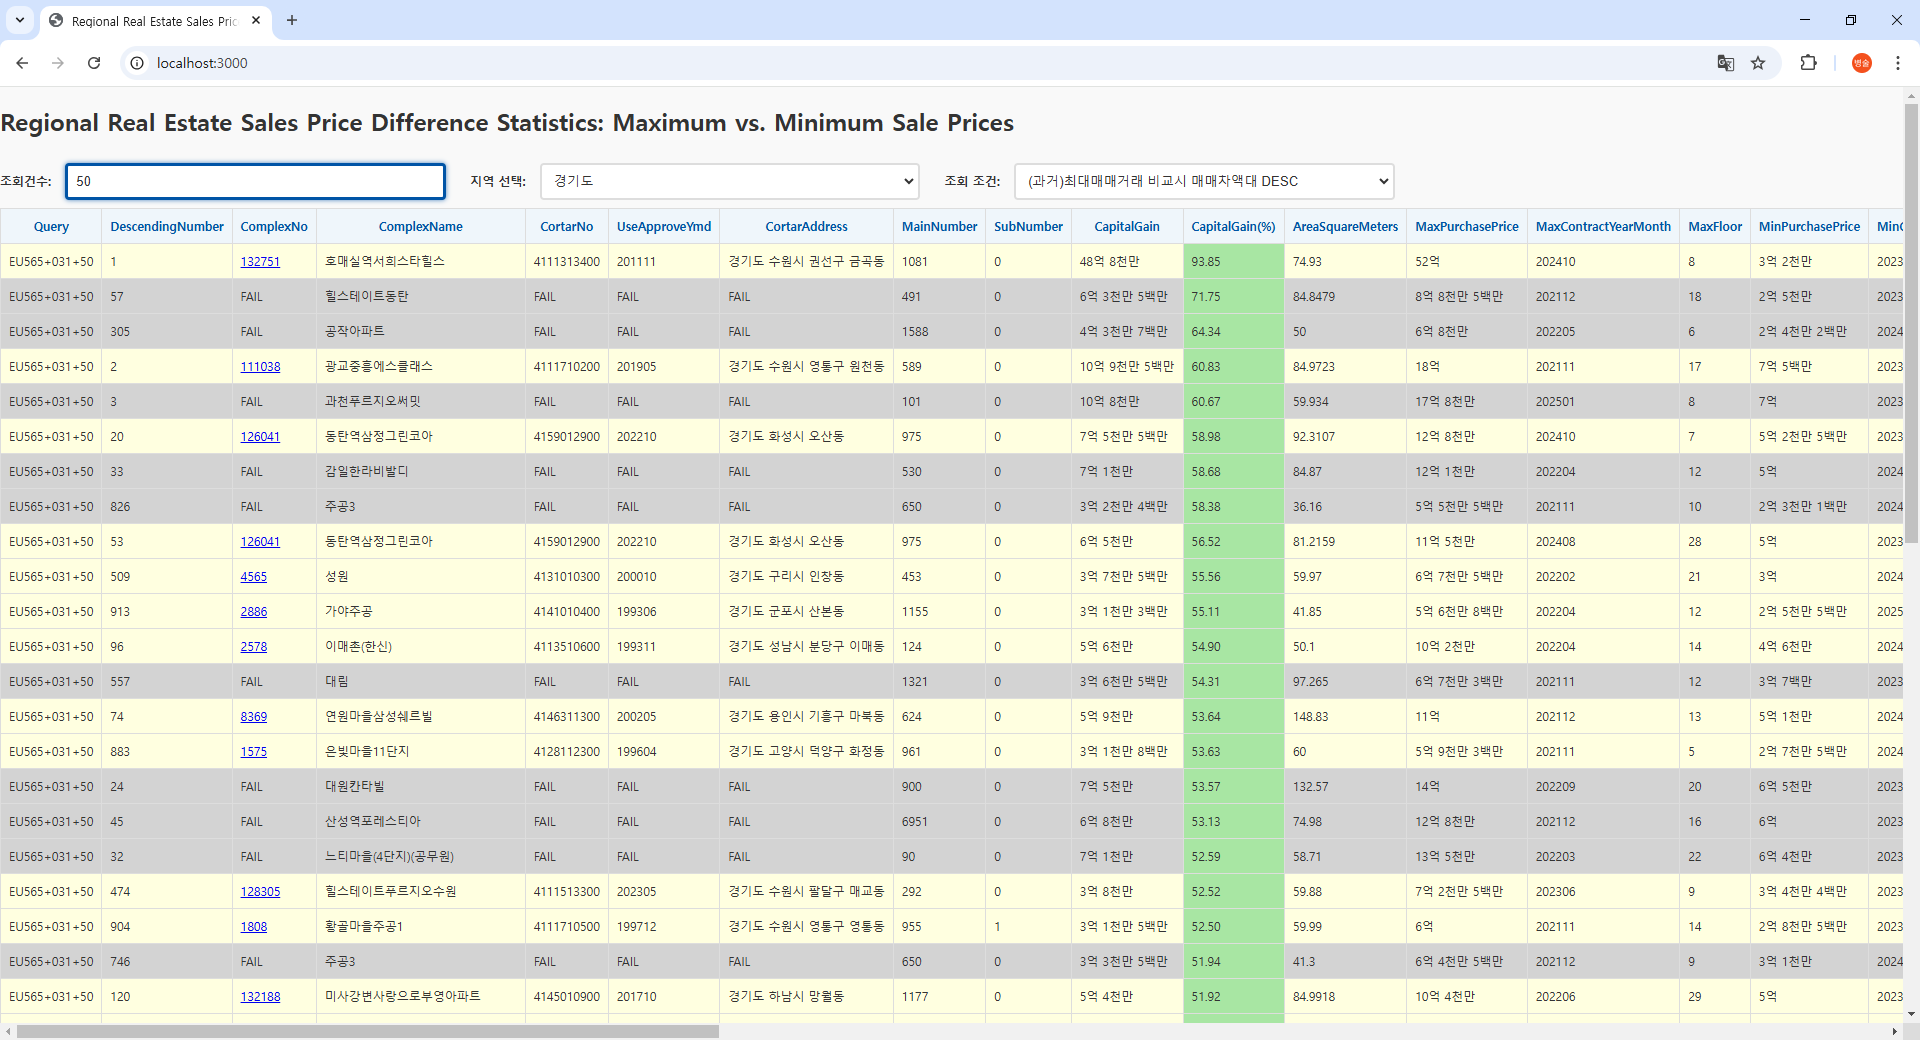
Ratio of Actual Transaction Price to Asking Price for Apartment Sales by Region(2019~2024)


index.html
0.02MB

naver_attach_info + apt_real_info

let etheaders_han = [
"Query ",
"DescendingNumber",
"네이버고유아파트번호",
"아파트이름",
"지역번호",
"승인일",
"네이버주소",
"지번",
"부번",
"매매금액차이",
"매매금액비율(%)",
"평형",
"최대매매금액",
"최대매매년도",
"최대매매해당층",
"최대매매금액",
"최대매매년도",
"최대매매해당층",
"지역번호",
"네이버 최저매매호가",
"네이버 최대매매호가",
"네이버 최저전세호가",
"네이버 최대전세호가",
"네이버 최저매매호가",
"네이버 최대매매호가",
"네이버 최저전세호가",
"네이버 최대전세호가",
"국토교통부주소",
"RealEstateTypeCode",
"RealEstateTypeName",
"LotNumber",
"Building",
"Buyer",
"Seller",
"국토교통부실거래금액",
"준공년도",
"국토교통부도로명주소",
"CancellationReasonDate",
"부동산거래타입",
"DataClass",
"InfoMarketClass",
"TransactionTime",
"중개장소",
"매매계약신고일",
"HousingType"
];
let etheaders = [
"Query", 
"DescendingNumber",
"ComplexNo",
"ComplexName",
"CortarNo",
"UseApproveYmd",
"CortarAddress",
"MainNumber",
"SubNumber",
"CapitalGain",
"CapitalGain(%)",
"AreaSquareMeters",
"PurchasePrice",
"ContractYearMonth",
"Floor",
"PurchasePrice",
"ContractYearMonth",
"Floor",
"Region",
"MinPriceByLetter",
"MaxPriceByLetter",
"MinLeasePriceByLetter",
"MaxLeasePriceByLetter",
"MinPrice",
"MaxPrice",
"MinLeasePrice",
"MaxLeasePrice",
"CityCounty",
"RealEstateTypeCode",
"RealEstateTypeName",
"LotNumber",
"Building",
"Buyer",
"Seller",
"TransactionAmount",
"ConstructionYear",
"RoadName",
"CancellationReasonDate",
"TransactionType",
"DataClass",
"InfoMarketClass",
"TransactionTime",
"BrokerLocation",
"RegistrationDate",
"HousingType"
];

let esheaders_han = [
"Query ",
"DescendingNumber",
"네이버고유아파트번호",
"아파트이름",
"지역번호",
"승인일",
"네이버주소",
"지번",
"부번",
"매매금액차이",
"매매금액비율(%)",
"평형",
"최대매매금액",
"최대매매년도",
"최대매매해당층",
"최소매매금액",
"최소매매년도",
"최소매매해당층",
"지역번호",
"네이버 최저매매호가",
"네이버 최대매매호가",
"네이버 최저전세호가",
"네이버 최대전세호가",
"네이버 최저매매호가",
"네이버 최대매매호가",
"네이버 최저전세호가",
"네이버 최대전세호가",
"국토교통부주소",
"RealEstateTypeCode",
"RealEstateTypeName",
"LotNumber",
"Building",
"Buyer",
"Seller",
"국토교통부실거래금액",
"준공년도",
"국토교통부도로명주소",
"CancellationReasonDate",
"부동산거래타입",
"DataClass",
"InfoMarketClass",
"TransactionTime",
"중개장소",
"매매계약신고일",
"HousingType"
];
let esheaders = [
"Query", 
"DescendingNumber",
"ComplexNo",
"ComplexName",
"CortarNo",
"UseApproveYmd",
"CortarAddress",
"MainNumber",
"SubNumber",
"CapitalGain",
"CapitalGain(%)",
"AreaSquareMeters",
"MaxPurchasePrice",
"MaxContractYearMonth",
"MaxFloor",
"MinPurchasePrice",
"MinContractYearMonth",
"MinFloor",
"Region",
"MinPriceByLetter",
"MaxPriceByLetter",
"MinLeasePriceByLetter",
"MaxLeasePriceByLetter",
"MinPrice",
"MaxPrice",
"MinLeasePrice",
"MaxLeasePrice",
"CityCounty",
"RealEstateTypeCode",
"RealEstateTypeName",
"LotNumber",
"Building",
"Buyer",
"Seller",
"TransactionAmount",
"ConstructionYear",
"RoadName",
"CancellationReasonDate",
"TransactionType",
"DataClass",
"InfoMarketClass",
"TransactionTime",
"BrokerLocation",
"RegistrationDate",
"HousingType"
];


index.html
0.03MB

const table = document.querySelector("table"); // 테이블 선택
const rows = table.querySelectorAll("tr"); // 모든 행 선택
const lightGreenColor = "#A8C6A3";  // 색상 값을 const 변수로 선언

rows.forEach((row) => {
const cells = row.querySelectorAll("td"); // 해당 행의 모든 <td> 가져오기
cells.forEach((col, index) => {
if (firstPartClass === "ES565" || firstPartClass === "ER565") {
if (index === 9) col.style.backgroundColor = lightGreenColor
} else if (firstPartClass === "EU565" || firstPartClass === "EV565") {
if (index === 10) col.style.backgroundColor = lightGreenColor
} else if (firstPartClass === "ET565" || firstPartClass === "ET564") {
if (index === 12) col.style.backgroundColor = lightGreenColor
}
});
});


색상HEX 코드설명

🍏 #28A745 col.style.backgroundColor = "#28A745"; 초록 + 연두빛
🍃 #40C463 col.style.backgroundColor = "#40C463"; 좀 더 밝고 싱그러운 초록
🌿 #6CD26F col.style.backgroundColor = "#6CD26F"; 연한 연두색
🌱 #A8E6A3 col.style.backgroundColor = "#A8E6A3"; 부드러운 연두색 (밝은 느낌)


index.html
0.03MB

app.js(조회+ 실시간 Push )
index.html

위의 js를 두가지 케이스로 분리
1. 조회
2. 실시간 Push

server.js
0.00MB
api.js
0.00MB
index.html
0.02MB


Important Notes:

  • The two servers (server.js and api.js) communicate with the same Redis instance, so they should be run separately.
  • Both servers can be running simultaneously because they handle different aspects of the application: one for WebSocket communication and polling (real-time data push), and the other for HTTP-based API requests.

Potential Issues:

  • Redis Connection Timing: Ensure Redis is up and running before starting either server. If Redis is down or unreachable, both the WebSocket server and the Express API might fail to connect. To handle this, consider adding retries or proper error handling when trying to connect to Redis in both server.js and api.js.

1. Start Redis and WebSocket Server (server.js) First

  • Why: The WebSocket server is listening for connections, and it continuously polls Redis to fetch data. It needs to be up and running first so it can handle incoming WebSocket connections and start processing Redis data.
  • Action: Run node server.js first. This starts the WebSocket server and Redis polling.

2. Start the Express API Server (api.js) Second

  • Why: The Express API server handles HTTP requests, including setting the Redis public key, sending data to Redis, and fetching data from Redis. It needs to be running after the WebSocket server because it could be interacting with the Redis database that is already being accessed by the WebSocket server.
  • Action: After server.js is running, run node api.js. This starts the Express API server, which interacts with Redis.

font-family: -apple-system, BlinkMacSystemFont, "Helvetica Neue", "Segoe UI", Roboto, Arial, sans-serif;

<style>
#loading {
display: none; /* 기본적으로 숨김 */
position: fixed;
top: 50%;
left: 50%;
transform: translate(-50%, -50%);
background-color: rgba(0, 0, 0, 0.7);
color: white;
padding: 40px; /* 2배로 증가 */
border-radius: 20px; /* 2배로 증가 */
    /*
font-family: -apple-system, BlinkMacSystemFont, "Helvetica Neue", "Segoe UI", Roboto, Arial, sans-serif;
font-family: 'Apple SD Gothic Neo', '돋움', Dotum, sans-serif;
font-family: 'Poppins', sans-serif;
    */
font-family: 'Nunito Sans', sans-serif;
/*
font-family: 'Montserrat', sans-serif;
font-family: 'IBM Plex Sans', sans-serif;
font-family: 'Nunito Sans', sans-serif;
*/
font-size: 40px; /* 2배로 증가 */
}
    </style>


index.html
0.02MB

+ Recent posts